
Last weekend I had the opportunity to learn how to make and can salsa with my parents and Grandma. Although I was excited to try something new in the kitchen, I have to say my favorite part of the day was spending time with family. I love my grandparents’ house; I spent a lot of time there growing up so it’s filled with memories and has that comforting feeling you get when you ‘go home’. One of the other great things about their house is company stopping in to visit, something that doesn’t seem to be as common anymore.
Look up the YouTube video ‘Doorbell’ by comedian Sebastian Maniscalco for a humorous view on the difference between reactions to your doorbell ringing today vs. 20 years ago; it’s hilariously on point.
So while my husband and I were there for the day we were able to visit with my grandparents, parents, two uncles, an aunt, one great uncle and a cousin! The mini family reunion was an added bonus to our day. Oh! We also had an extra traveler with us this time…as if life wasn’t busy enough we adopted this adorable pup we now call Max 🙂

He did so well on his first day trip and had a blast running around with my grandma’s dog Louie while we were busy in the kitchen! If you live in the Ohio area, we adopted this cutie from a non-profit organization called Cause for Paws! They are wonderful and help save a significant number of dogs (as well as a few cats) each year!
As with my other canning posts, I’m going to do my best to walk you through the process step by step. Let’s start by gathering the ingredients. Too many times I’ve started cooking or baking only to realize I’m missing an ingredient half way through and have to hope I find an acceptable alternative hiding in my kitchen!

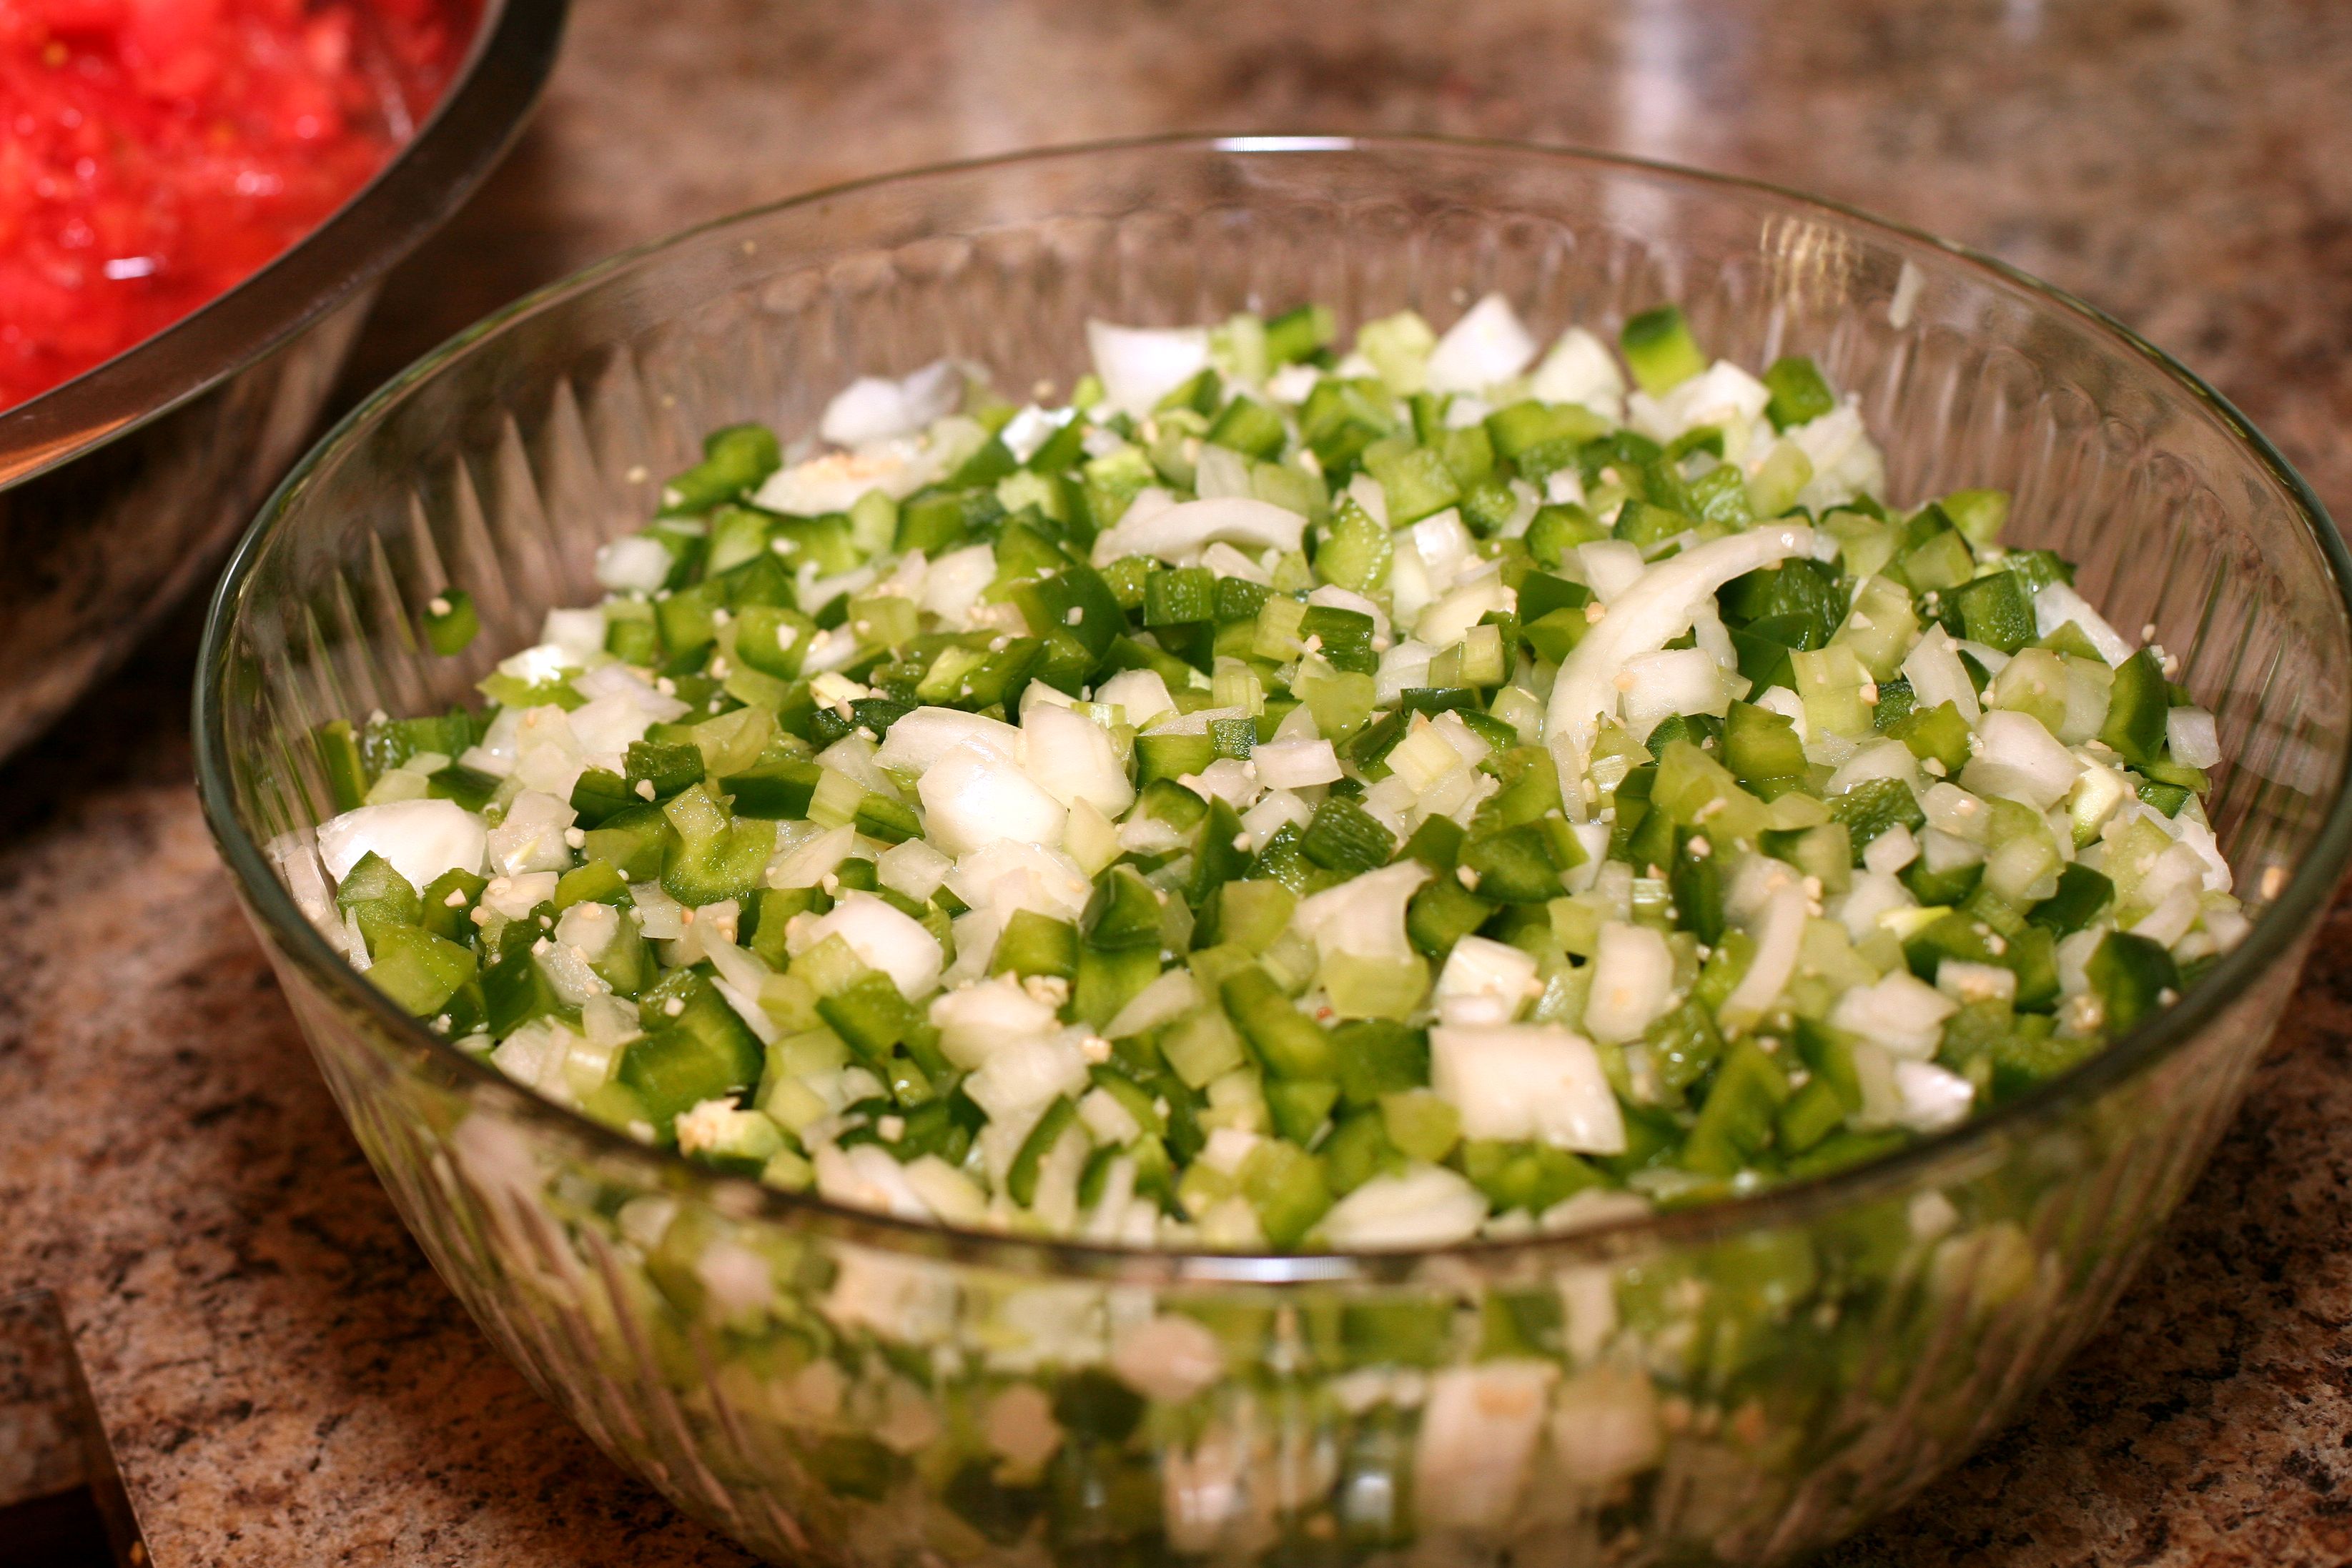
The first part of the day started out with prep work at my parents’ house before we got into town. My Dad spent the beginning of the morning chopping vegetables and lots of them, because we actually made two batches of salsa! So once you have your ingredients gathered, clean and chop the green peppers, onions, celery and jalapenos and mix together in an extra large bowl. Go ahead and add the garlic to this bowl too.
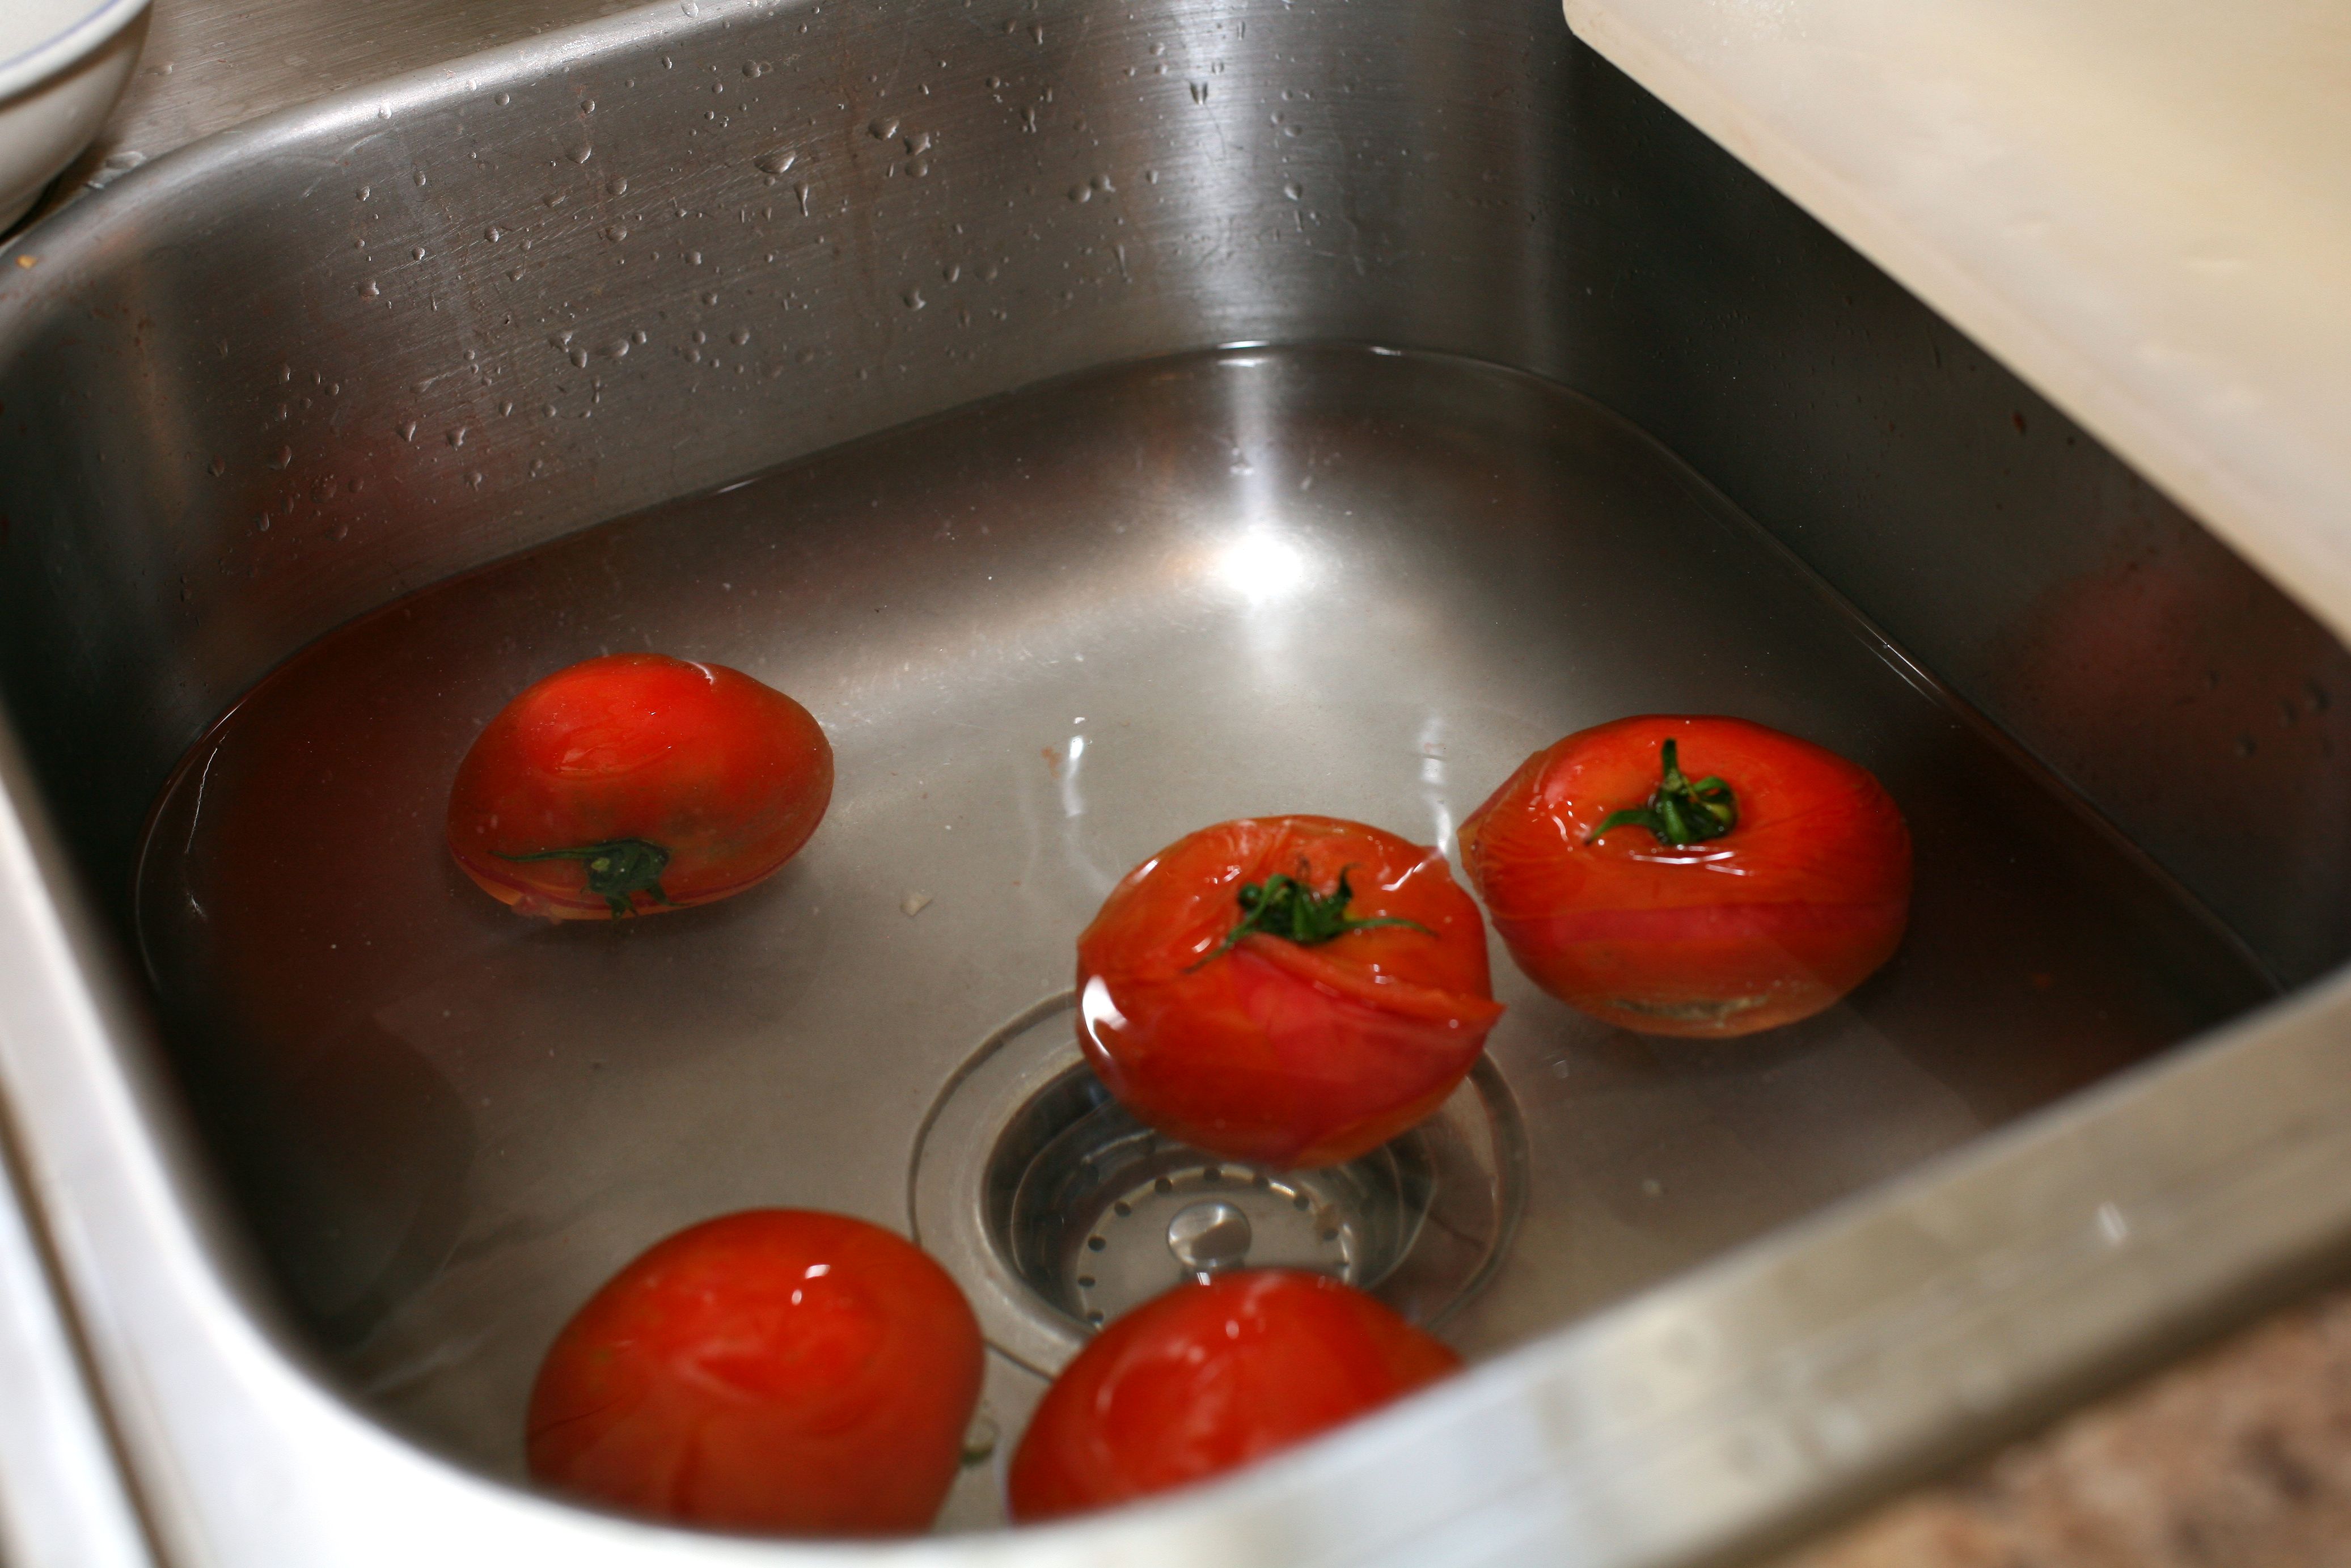
Next you’ll want to work with the main ingredient, tomatoes. Large Roma tomatoes are best for salsa, but any variety can be used. We stuck with a common large sandwich tomato, because we can pick them fresh from my grandma’s garden. Start by blanching the tomatoes in boiling hot water on the stove for 20 – 30 seconds and turning as needed. I think everyone in the family now has the roasting pan pictured below; it’s perfect for baking easy dinners in the oven and worked well for the salsa process too. We attempted to wash and put this pan away multiple times throughout the afternoon before realizing we kept needing “a few more tomatoes” 🙂

Once you take the tomatoes out of the boiling water, place them directly into cool water. This process is going to help with the next step of removing the skin from the tomatoes. For the most part, you’ll be able to pull the skins right off. Use a knife to assist as needed.
Once the skins have been removed from the tomatoes, cut them in half vertically and remove the seeds. Work cautiously, because the tomatoes become slippery at this point! We used a strawberry huller to remove the seeds that worked perfectly. You could also use a grapefruit spoon or other similar scoop. If you have a little trouble with this step or find it to be harder than it sounds, you’re not alone. My homework from this canning session is definitely practicing my slicing and seeding skills!

Now the tomatoes are ready to be chopped, how finely is up to you and depends on your preference of smooth or chunky sauce. For either style I suggest chopping by hand versus using a food processor or other chopping appliance that will speed up the process, but create too much juice.

Good news, the prep work is done! Better news…that was the most time consuming part of the process! Now you’ll start adding the ingredients to a large kettle on the stove starting with the tomatoes and draining excess juice as you add them. Follow with your bowl of peppers, onions, garlic and celery and gently stir to mix well. Finish this step by adding the vinegar, paste and salt and stirring once more to mix everything together.
I may have been distracted by a cute puppy for a minute at this point, because I forgot to take a photo at this part. Oops! Here’s another cute Max photo to make up for it 🙂

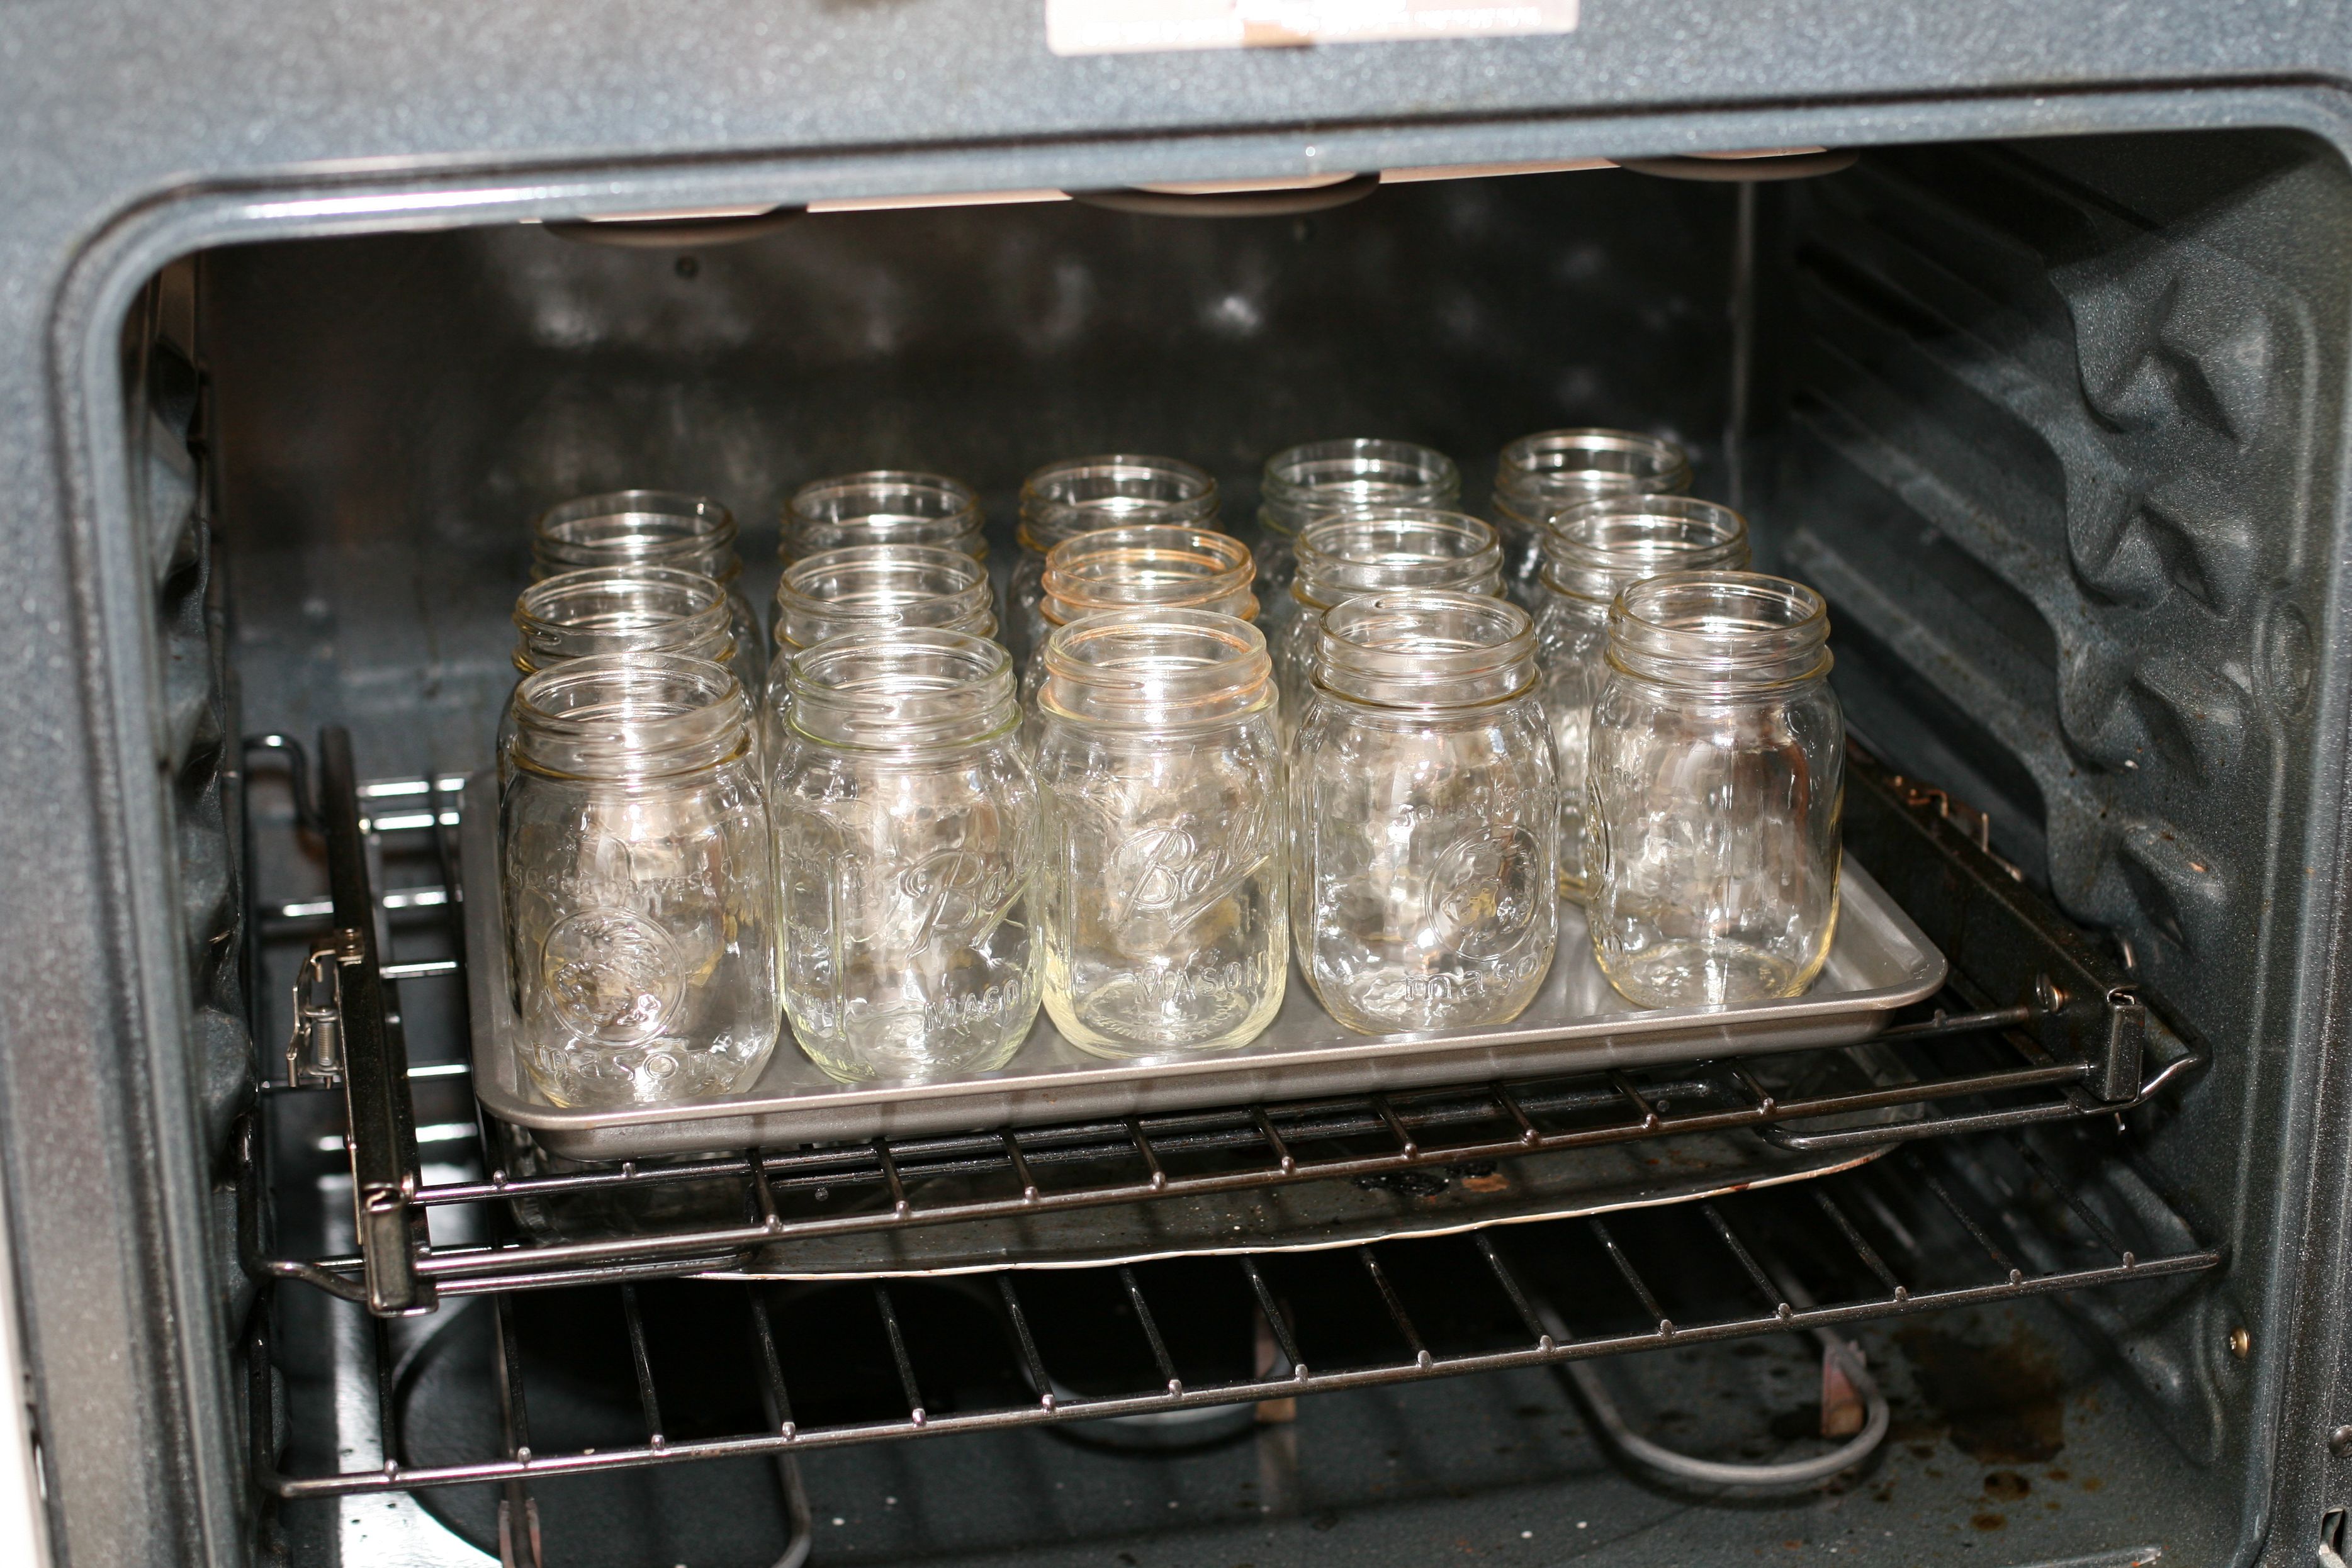
Once the salsa reaches a boil, reduce the heat and cook for 8 minutes stirring regularly. After 8 minutes, stir in the brown sugar and cook for an additional 7 minutes before reducing heat once more to keep warm and simmer until the desired consistency has been reached. The simmer time will depend on how thick you prefer the salsa, the longer it simmers the thicker it will be. While the salsa is cooking, heat the oven to 200 degrees and start sanitizing your jars. They can remain in the oven until ready to be used. The lids can be sanitized at this time too by sitting in a pot of boiling water on the stove.
Once the salsa has reached your desired consistency, remove jars from the oven using an oven mitten and begin pouring the salsa into jars through a funnel. Fill each jar to the bottom of the neck. You can work with 7 pint jars at a time as that’s how many will fit into the cold packer insert at once.

After the salsa is poured, clean the rim of each jar with a dry paper towel ensuring not even a drop of salsa remains. As I mentioned previously in the canning posts for green beans and tomato juice, any ‘debris’ on the rim of the jar will prevent proper canning. Next you can add your lids and rings. Be sure to tighten well!

The final step is prepping the cold packer and adding the salsa. Be sure the cold packer is filled with enough water to completely cover the jars (you can add more after they are placed in the cold packer insert if needed) A tip I’ve shared before is to also mix vinegar in the water which makes the jars nice and shiny! Add a pint jar to each designated spot of the insert, bring the water to a boil, cover and set your timer for 16-18 minutes. (The photo insert of this part isn’t the greatest, but a visual none the less. If I was just a bit taller… :))

While the salsa is in this final cooking stage you can begin jarring up the next seven pints. When the first seven are done, carefully remove the jars from the cold packer using canning tongs and place them on a heat resistant surface to cool. Listen for the pop of the jars that signifies the true completion of the process. Repeat with remaining jars until nearly all of the salsa has been used.

I say nearly all of the salsa, because by this point you deserve to enjoy a little of it. While your last batch of jars is cooking grab your favorite tortilla chips and dip in! We’ve also used this salsa when cooking chicken tacos or even as a topping to hotdogs and I’m positive there are plenty more uses to be found. This particular recipe is not very spicy so if you like the heat add more jalapeno/seeds or replace the jalapenos with hotter peppers.
Find the ingredient amounts and a recap of the instructions below. Happy Canning!
Homemade Salsa (Recipe makes approximately 16-18 pints)
Ingredients
- 6 Quarts Tomatoes (Seeds and skin removed, then chopped)
- 8 Celery Stalks (Diced small)
- 3 Large Sweet Onions (chopped small)
- 6 Jalapeno peppers (Removed seeds/veins and chopped small – for hotter salsa leave seeds and veins)
- 6 Green Peppers (chopped small)
- 3 Tbsp Minced Garlic
- 1 Cup White Vinegar or Cider Vinegar (we used white)
- 1 1/4 Cup Brown Sugar
- 3 Tbsp Canning Salt
- 2 12oz Cans of Contadina Tomato Paste
- 16 – 18 Pint Jars, Lids and Rings
Instructions
- Clean and chop green peppers, onions, celery and jalapenos. Add to a large mixing bowl, mix in garlic and set aside.
- Blanche tomatoes for 20 seconds per batch, remove skin, slice in half vertically then remove seeds and chop. Drain excess juice as you measure the six quarts.
- Add tomatoes to the kettle on the stove.
- Add mixture of peppers, onions, celery and garlic to the kettle and stir with the tomatoes.
- Add vinegar, paste and salt and stir all ingredients together.
- Bring salsa to a boil, reduce heat and cook for 8 minutes while stirring regularly.
- Stir in brown sugar and cook an additional 7 minutes, still stirring regularly.
- Reduce heat to keep warm and stir regularly until desired thickness is reached.
- Place jars in the oven at 200 degrees for 5-10 min and lids in boiling water for 2 minutes to sterilize.
- Fill jars (working with seven pints at a time) to the bottom of the neck with salsa and wipe off rim using a dry paper towel.
- Place lids on jars, put rings on and tighten.
- Add jars to designated spots in cold packer filled with enough water to cover the jars completely. Bring to a boil and cook for 15-18 minutes. *Include ½ cup vinegar in water to make jars shine.
- Remove jars using canning tongs, sit on a heat resistant surface and allow to cool making sure all jars seal. Listen for the pop!
- Write the date on the lid using a permanent marker and store in a cool, dark place.
As always, thanks for reading!!


Pingback: Taco Stuffed Peppers | Our Front Door Looking in...
Mmmm, that looks very delicious!
LikeLike